Over at WAMP, theres been a call for help... for painting.
Basically, theres a plan to paint up 2 armies (a Crimson Fists army for Warhammer 40k, and a German army for FOW/Flames of War)
Eventually theres a hope that these armies can be auctioned off and the proceeds given to the charity.
I've offered my support in helping out with some scout squads for the Crimson Fists army (I'm not used to the 15mm scale of FOW, so I didnt even contemplate that one) but that should give me an interesting challenge in that a Desert colour scheme is the main theme of the army, so I'm going to have to try and work out how do do a desert camo arrangement on the scout cloaks.
Hopefully this should all be kicking off sometime in the first quarter of 2011, so watch this space... or even more preferably, the blog that is being created specifically for the project - for more information and updates.
Sunday, 9 January 2011
Sunday, 5 December 2010
Starting a Tyranid army
This little project of mine is to satisfy 2 things - 1 - its an army I want to build up from scratch because for some reason I love close combat themed armies in Warhammer 40k, and 2 - its an entry for a painting competition in WAMP which I have recently become a member of.
There are plenty of photos of progress in my Flickr gallery but for my initial post, I'll write something about the colour scheme I have chosen.
I primarily use Vallejo Game Colour paints, along with citadel washes - I much prefer the dropper bottle arrangement for my paints, which gives me a much easier time to get them out on my work area and then from there I can apply my thinner mixture to the paints. For washes I tend to slap them on quite liberally, so I don't mind dispensing those direct from the pot, which is where the citadel ones come in much better than the dropped bottles.
As far as they key areas of the model, the colours I use are as follows:
Undercoat
White spray where possible, otherwise white brush-on (white primer from Vallejo)
Body
Cold Grey base coat
Badab Black Wash
Overbrush Cold Grey
Drybrush Elf Flesh (lightly over certain areas)
Elf flesh painted on to raised spines
Sinews
Squid Pink
Baal Red Wash
Carapace
Black basecoat
Ultramarine blue first drybrush
Eectric blue edging/drybrush
Hooves/Claws
Elfic Flesh
Devlan Mud Wash
Eyes
Escorpina Green
Thrakka Green Wash
If I refine any of the colours to something a bit different as it develops, I'll post about it, otherwise work in progress shots will be posted a bit later.
Sunday, 14 November 2010
My foray into 54mm goodness
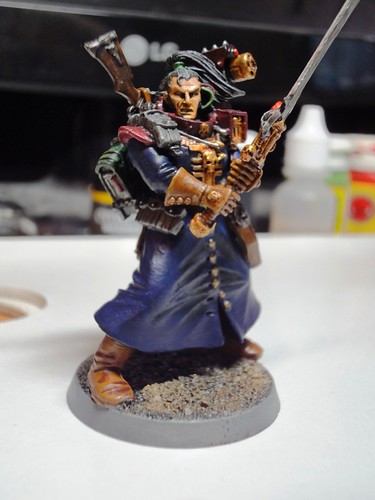
One thing about practice makes perfect... you need to keep on practicing. I've never really looked into anything large scale before (other than vehicles and robots in my 40k armies) so I set aside that issue and went to see about painting up a 54mm miniature, specifically that of the Covenant figure from the Inquisitor series by Games Workshop.
This figure was mainly done to test my abilities in large scale model, but ultimately too for selling for the shop.
In order to be positive first and foremost, what I liked about it:
1) This is the first model that I have put pupils into the eyes, and its all the better for it. I tend to keep my eyes pupil-less in the 28mm stuff, but that can end up making my humanoid figures look like zombies rolling their eyes back into their heads - with things with solid eyes of course thats not really a problem (thinking tryannids or space marines with helmets)
I'm really proud of the pupils, I managed to get them both looking in the same direction, having a cross-eyed inquisitor could be a bit of a problem.
2) The face - having a bit more space to work with, I managed about 3 layers of highlighting on the face. It doesnt show up well in the pictures, but it looks great in person.
Now though for the things im not too happy about:
1) I primed the miniature using Gesso as I had started doing early in the blog. For plastic miniatures, this has been great, but for white metal figures, I'm not sure if I just didnt leave it to dry for long enough or not, but every single time I picked the figure up, I would end up rubbing off some of the paint. I ended up having to varnish the figure after area had been finished to try and give it some sort of protection from handling. That seemed to work, but there were far too many layers of paint on this by the end of it.
2) My freehand skills are non existant, therefore I didn't bother doing anything on the wide open space of the trenchcoat. On the box for the model, it's got a nicely drawn inquisitor symbol on it, but my figure has been left plain. I honestly dont think it detracts too much from the model though.
3) I didnt highlight the coat, only worked down with varying shades of wash to make an appearance of depth. Again, I don't think the model suffered too much for that, but it's one area I'd maybe consider doing something different in the future.
As per usual, my work in progress shots are shown on my photostream:This figure was mainly done to test my abilities in large scale model, but ultimately too for selling for the shop.
In order to be positive first and foremost, what I liked about it:
1) This is the first model that I have put pupils into the eyes, and its all the better for it. I tend to keep my eyes pupil-less in the 28mm stuff, but that can end up making my humanoid figures look like zombies rolling their eyes back into their heads - with things with solid eyes of course thats not really a problem (thinking tryannids or space marines with helmets)
I'm really proud of the pupils, I managed to get them both looking in the same direction, having a cross-eyed inquisitor could be a bit of a problem.
2) The face - having a bit more space to work with, I managed about 3 layers of highlighting on the face. It doesnt show up well in the pictures, but it looks great in person.
Now though for the things im not too happy about:
1) I primed the miniature using Gesso as I had started doing early in the blog. For plastic miniatures, this has been great, but for white metal figures, I'm not sure if I just didnt leave it to dry for long enough or not, but every single time I picked the figure up, I would end up rubbing off some of the paint. I ended up having to varnish the figure after area had been finished to try and give it some sort of protection from handling. That seemed to work, but there were far too many layers of paint on this by the end of it.
2) My freehand skills are non existant, therefore I didn't bother doing anything on the wide open space of the trenchcoat. On the box for the model, it's got a nicely drawn inquisitor symbol on it, but my figure has been left plain. I honestly dont think it detracts too much from the model though.
3) I didnt highlight the coat, only worked down with varying shades of wash to make an appearance of depth. Again, I don't think the model suffered too much for that, but it's one area I'd maybe consider doing something different in the future.
http://www.flickr.com/photos/1man1brush/sets/72157625207749475/
Finally, a picture of the completed miniature:
Wednesday, 10 November 2010
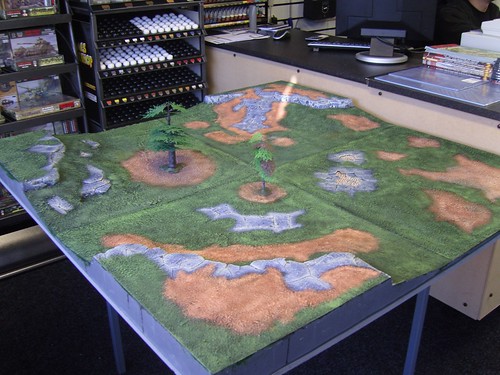
Realm of Battle
I'm one of those guys who back in the day used to have a flat, green cloth battlefield with the occasional rock and model tree to break up the dullness. Having a decent, sculpted battlefield to fight over with hills and hollows built into it seemed like a far off fantasy, as DIY was never one of my strong points, and aside from the occasional bit of cut polystyrene covered in wall filler to make it a bit more durable, my scenery making days were fairly limited to small, portable pieces, and modular terrain was something well beyond my skill levels.
After I spotted the Citadel Realm of Battle I was smitten. I was shocked at the price too, but smitten all the same. Then the store came along, with its trade prices.
I just had to give one a go. It would make a nice centrepiece for the store, so armed with a nice big bag of reptile sand (after a bit of a failure at getting decent sand at B&Q and picking up a bag of wet, builders sand, and realising that it came out in big clumps and not loose) and a massive pot of PVA glue, I set to work on the boards covering them over with the basing mix to give it a nice texture to play on.
I keep on forgetting just how big 6 lots of 2 foot square clumps of hard polystyrene could be. The entire living room floor seemed to be covered with newspaper to try and keep the spillages to a minimum, but after some investing in some 'artists acrylic' (read great big pots for about the same price as I pay for my small miniature painting pots of paint) I set to work with the basecoating and drybrushing, on a set of nice half and inch wide brushes I picked up.
I picked a fairly standard 'green grass with patches of mud showing through to break up the monotony' look just to keep it roughly in line with my green bases since these were all going to generally go together as display pieces in the shop, and I kept my stone colouring the same as the smaller rock assemblies I have done as loose pieces of scenery.
As far as a review of the boards....
I like them. They're sturdy themselves, but of course the miniatures have serious problems sliding down the hills, but that was somewhat stopped by my liberal application of sand to give something that provides a bit more friction.
The obvious thing that pretty much everyone else has commented on are the 'tectonic skulls' - i.e. the fact the entire land seems to have been rested on a sea of skulls, since every single crack in the ground has a few skulls inside them, but its still a nice board even with that glaring issue.
The clips are pretty poor, but as long as you rest the boards on a baseboard of some type, it's got no problem sticking together even after some accidental knocks, and some non accidental 'moving all around the place to get past it' moments.
Theres a few work in progress shots of the board in my flickr account, and for those that don't like clicking links, heres a photo of the finished article - though its only 4 of the 6 boards as the others wouldn't fit where we had them on display.
Finally... a link to the aforementioned Flickr album... enjoy:
http://www.flickr.com/photos/1man1brush/sets/72157625332444670/
Monday, 8 November 2010
A word from our sponsors...
Well not really, since i'm not actually getting sponsored in any way, but on the other hand, since the reason why I got back into the hobby was due to pestering from a friend of mine about how I should help him by painting up some miniatures, I thought I should really give a link for his shop in my blog.
I'm kinda working on a banner to hopefully get some paid advertising up on some well known forums relating to miniature collecting/painting/gaming, but for now, you all out there in blogging land can see the first draft (and my first foray into making an animated GIF... no doubt you can see that I've never done this before today....)
I'm kinda working on a banner to hopefully get some paid advertising up on some well known forums relating to miniature collecting/painting/gaming, but for now, you all out there in blogging land can see the first draft (and my first foray into making an animated GIF... no doubt you can see that I've never done this before today....)

Sunday, 7 November 2010
Cypher - The Fallen Angel
This was my first ever fully painted miniture since I returned to painting in late 2009/early 2010.
Cypher was one of those characters from the Dark Angel codex that I always thought was really great in the fluff' but I'm somewhat certain that there was never a figure in production for him, and my skills with the greenstuff are sorely lacking.
When I returned to the hobby, I found that my friend had a couple of these traded in, so I couldn't resist giving it a go.
Now... a bit of self criticism - I think I didnt quite get the hang of thinning out the paints to the right consistency for doing this - some of the areas seem a bit too thick, especially the skeleton on his chest, theres some areas where the bone colour smothered over the chestnut ink shading completely removing the shadow.
On the positive side, I think the cloak shading was quite good - Shading of the Dark Angel robes was always my failure back in the day (they were just solid colour, no shading/highlighting at all) at least now I managed to pick out some of the highlights. They're a bit blocky for my liking, but considering this was the first full miniature I painted for over 5 years, I was quite happy with it.
For some photos of the miniature, see the link to Flickr below:
http://www.flickr.com/photos/1man1brush/sets/72157625332318970/with/5154408067/
Back to it... lots of updates to come
OK, in all honesty, I forgot I was starting this blog. I apologise... I'm a bad man (but in a good way, dont let anyone tell you otherwise)
So far I've done a few little projects that I've not wrote about on here. I'll be documenting those, and also my newest little project as well.
The list of up and coming posts are as follows:
1) I painted up a Cypher figure that I had always wanted to do back in the day
2) Im working on several 'house armies' for the shop - the first of these is a Blood Angel army worth about 1500 points.
3) I worked on a 54mm figure, specifically the Inquisitor Covenant figure
4) My newest project is working on a second house army, of 1500 points of Tyranids.
I've also made a new Flickr account to upload all my work in progress shots, if anyone wants to see some of the images before the write up goes with them, feel free to look.
http://www.flickr.com/photos/1man1brush/
Subscribe to:
Posts (Atom)